I Eat, Drink SharePoint. Everything about SharePoint 2010. From what is sharepoint to custom development.
Wednesday, March 16, 2011
ADLDS-Forms Based Authentication in SharePoint 2010
This AD-LDS is new and comes in Windows Server 2008. This is formerly known as ADAM. In SharePoint 2010 while creating a web application we have an option to choose the application authentication mode Claims Based and Classic Mode.
Creating a web application which uses Claims Based Authentication:
This is pretty much straight forward,
· Open Central Administration
· From Application Management - > Manage Web Applications
· From the top ribbon bar, select New
· From the create web application page, chose the authentication mode to “Claims Based Authentication”
· Give the name of web application, chose port number, path of web application.
· Chose security configuration
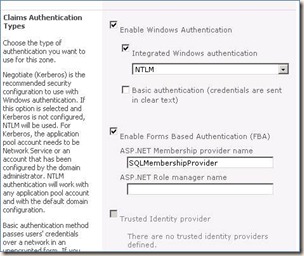
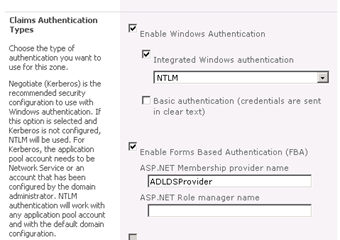
· From Claims Authentication Types, enable both WA and FBA.
· In FBA section we have to give ASP.NET Membership provider name. In my case I have used “ADLDSProvider” and I am not using any roles so I left it blank.
· Enter Sign in page url [default one], public url and other information and click OK.
· Once web application is created, then create a site collection.
· Now go to Manage Web application and from the list of web applications chose the option “Authentication Providers” from the ribbon.
· From the dialog box you will see the Default zone set to the Claims authentication mode. Click the Default zone link where you can see the settings.
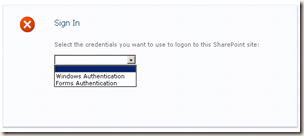
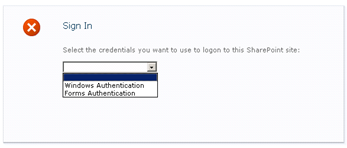
· OK, application is ready and browse the application, you will see the below screen which gives you the option to choose either Windows Authentication or Forms authentication.
· The remaining part is linking our application and AD-LDS.
Give specific permissions to the service accounts:
· The service account or application pool user account of our FBA application,
· application pool account [service account] of central administration and
· security token service application pool user account
should have access to the ADLDS to go and get information of the users and roles. Almost in all environments the system administrators creates the service accounts we have to use in our applications. If you are not following those base rules in using service accounts then you may use different service accounts for all the three applications. In that case you have to go through all the three application we have mentioned above and give them access to ADLDS. If you are following the rules of using service accounts then may be only one service account used for all the three applications and give the service account access to ADLDS.
Modify web.config files of applications to communicate with ADLDS using providers
1. To get the users from ADLDS to central administration site we have to change web.config of Central Administration site.
2. To get the users from ADLDS to web application which we created to work FBA, we have to change its web.config.
3. To login to the site using claims based authentication, it uses security token service application. So, we have to change its configuration file.
So, the site we created for FBA to work using forms authentication we have to change 3 web.config files totally.
Note: Before you are making any changes to the web.config file of any application please take the backup of it.
The main changes include connection string and providers.
i. Modify web.config of web application we created:
Adding providers for membership and role [if needed]
Before you add any providers find are there any membership or rolemanager tags in the web.config file. And add the providers [<rolemanager> and <membership>] to the <System.Web> tag. Make sure that you are not doing any changes to the existing providers. By default there are providers with name “C” and “I”. So, do not touch them and add only the providers which we are adding like “SQLRoleManager” and “SqlMembershipProvider”. Finally the <rolemanager> section and <membership> section as shown below. Highlighted in red tags are I added to web.config.
<membership defaultProvider="i">
<providers>
<add name="i" type="Microsoft.SharePoint.Administration.Claims.SPClaimsAuthMembershipProvider, Microsoft.SharePoint, Version=14.0.0.0, Culture=neutral, PublicKeyToken=71e9bce111e9429c" />
<add name="ADLDSProvider"
type="Microsoft.Office.Server.Security.LDAPMembershipProvider, Microsoft.Office.Server, Version=14.0.0.0, Culture=neutral,
PublicKeyToken=71E9BCE111E9429C" server="SP2010-ADLDS"
port="389" useSSL="false"
userDNAttribute="distinguishedName"
userNameAttribute="userPrincipalName"
userContainer="CN=Users,CN=Customers,DC=Northwind,DC=Extranet"
userObjectClass="user" userFilter="(ObjectClass=user)"
scope="Subtree" otherRequiredUserAttributes="cn" />
</providers>
</membership>
<roleManager defaultProvider="c" enabled="true" cacheRolesInCookie="false">
<providers>
<add name="c" type="Microsoft.SharePoint.Administration.Claims.SPClaimsAuthRoleProvider, Microsoft.SharePoint, Version=14.0.0.0, Culture=neutral, PublicKeyToken=71e9bce111e9429c" />
</providers>
</roleManager>
Save all your changes and we are done with configuration changes for FBA site.
ii. Modify web.config of Central Administration site
Adding providers for membership and role [if needed]
Before you add any providers find are there any membership or rolemanager tags in the web.config file. And add the providers [<rolemanager> and <membership>] to the <System.Web> tag. Make sure that you are not doing any changes to the existing providers. Finally the <rolemanager> section and <membership> section as shown below. Highlighted in red tags are I added to web.config.
<roleManager defaultProvider="AspNetWindowsTokenRoleProvider" enabled="true" cacheRolesInCookie="false">
<providers>
</providers>
</roleManager>
<membership defaultProvider="ADLDSProvider">
<providers>
<add name="ADLDSProvider"
type="Microsoft.Office.Server.Security.LDAPMembershipProvider, Microsoft.Office.Server, Version=14.0.0.0, Culture=neutral,
PublicKeyToken=71E9BCE111E9429C" server="SP2010-ADLDS"
port="389" useSSL="false"
userDNAttribute="distinguishedName"
userNameAttribute="userPrincipalName"
userContainer="CN=Users,CN=Customers,DC=Nothwind,DC=Extranet"
userObjectClass="user" userFilter="(ObjectClass=user)"
scope="Subtree" otherRequiredUserAttributes="cn" />
</providers>
</membership>Save the web.config file and we are done with configuration changes for CA.
iii. Modify web.config of Security Token Service Application
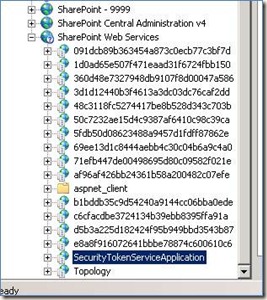
Open inetmgr from run command and open IIS. From the list of sites available expand “SharePoint Web Services” and find SecurityTokenServiceApplication.
Right click on the application and explore, which will opens the file system file location of the application. By default it will be in “%programfiles%\common files\Microsoft Shared\web server extensions\14\WebServices\SecurityToken”. Find the web.config of the application and modify it.
Adding providers for membership and role [if needed]
Before you add any providers find are there any membership or rolemanager tags in the web.config file. And add the providers [<rolemanager> and <membership>] to the <System.Web> tag. Make sure that you are not doing any changes to the existing providers. By default there are providers with name “C” and “I”. So, do not touch them and add only the providers which we are adding like “SQLRoleManager” and “SqlMembershipProvider”. Finally the <rolemanager> section and <membership> section as shown below. Highlighted in red tags are I added to web.config.
<roleManager defaultProvider="c" enabled="true" cacheRolesInCookie="false">
<providers>
<add name="c" type="Microsoft.SharePoint.Administration.Claims.SPClaimsAuthRoleProvider, Microsoft.SharePoint, Version=14.0.0.0, Culture=neutral, PublicKeyToken=71e9bce111e9429c" />
</providers>
</roleManager>
<membership defaultProvider="i">
<providers>
<add name="i" type="Microsoft.SharePoint.Administration.Claims.SPClaimsAuthMembershipProvider, Microsoft.SharePoint, Version=14.0.0.0, Culture=neutral, PublicKeyToken=71e9bce111e9429c" />
<add name="ADLDSProvider"
type="Microsoft.Office.Server.Security.LDAPMembershipProvider, Microsoft.Office.Server, Version=14.0.0.0, Culture=neutral,
PublicKeyToken=71E9BCE111E9429C" server="SP2010-ADLDS"
port="389" useSSL="false"
userDNAttribute="distinguishedName"
userNameAttribute="userPrincipalName"
userContainer="CN=Users,CN=Customers,DC=Northwind,DC=Extranet"
userObjectClass="user" userFilter="(ObjectClass=user)"
scope="Subtree" otherRequiredUserAttributes="cn" />
</providers>
</membership>
If everything goes well, then in central administration site and your FBA application people picker able to find the users in the ADLDS. And you will successfully logged-in to the site without any issues.

ADAM-Forms Based Authentication in SharePoint 2010
Basically Forms Based Authentication is a part of ASP.NET. So, it supports in all versions of SharePoint which are released after ASP.NET 2.0. In SharePoint 2010 it is the same process as what we did in earlier versions like WSS 3.0 and MOSS 2007 except one thing. In SharePoint 2010 while creating a web application we have an option to choose the application authentication mode Claims Based and Classic Mode.
Creating a web application which uses Claims Based Authentication:
This is pretty much straight forward,
· Open Central Administration
· From Application Management - > Manage Web Applications
· From the top ribbon bar, select New
· From the create web application page, chose the authentication mode to “Claims Based Authentication”
· Give the name of web application, chose port number, path of web application.
· Chose security configuration
· From Claims Authentication Types, enable both WA and FBA.
· In FBA section we have to give ASP.NET Membership provider name. In my case I have used “ADAMProvider” and I am not using any roles so I left it blank.
· Enter Sign in page url [default one], public url and other information and click OK.
· Once web application is created, then create a site collection.
· Now go to Manage Web application and from the list of web applications chose the option “Authentication Providers” from the ribbon.
· From the dialog box you will see the Default zone set to the Claims authentication mode. Click the Default zone link where you can see the settings.
· OK, application is ready and browse the application, you will see the below screen which gives you the option to choose either Windows Authentication or Forms authentication.
· The remaining part is linking our application and ADAM.
Give specific permissions to the service accounts:
· The service account or application pool user account of our FBA application,
· application pool account [service account] of central administration and
· security token service application pool user account
should have access to the ADAM to go and get information of the users and roles. Almost in all environments the system administrators creates the service accounts we have to use in our applications. If you are not following those base rules in using service accounts then you may use different service accounts for all the three applications. In that case you have to go through all the three application we have mentioned above and give them access to ADAM. If you are following the rules of using service accounts then may be only one service account used for all the three applications and give the service account access to ADAM.
Modify web.config files of applications to communicate with ADAM using providers
1. To get the users from ADAM to central administration site we have to change web.config of Central Administration site.
2. To get the users from ADAM to web application which we created to work FBA, we have to change its web.config.
3. To login to the site using claims based authentication, it uses security token service application. So, we have to change its configuration file.
So, the site we created for FBA to work using forms authentication we have to change 3 web.config files totally.
Note: Before you are making any changes to the web.config file of any application please take the backup of it.
The main changes include connection string and providers.
i. Modify web.config of web application we created:
Adding providers for membership and role [if needed]
Before you add any providers find are there any membership or rolemanager tags in the web.config file. And add the providers [<rolemanager> and <membership>] to the <System.Web> tag. Make sure that you are not doing any changes to the existing providers. By default there are providers with name “C” and “I”. So, do not touch them and add only the providers which we are adding like “SQLRoleManager” and “SqlMembershipProvider”. Finally the <rolemanager> section and <membership> section as shown below. Highlighted in red tags are I added to web.config.
<membership defaultProvider="i">
<providers>
<add name="i" type="Microsoft.SharePoint.Administration.Claims.SPClaimsAuthMembershipProvider, Microsoft.SharePoint, Version=14.0.0.0, Culture=neutral, PublicKeyToken=71e9bce111e9429c" />
<add name="ADAMProvider"
type="Microsoft.Office.Server.Security.LDAPMembershipProvider, Microsoft.Office.Server, Version=14.0.0.0, Culture=neutral,
PublicKeyToken=71E9BCE111E9429C" server="SP2010-ADAM"
port="50389" useSSL="false"
userDNAttribute="distinguishedName"
userNameAttribute="userPrincipalName"
userContainer="DC=Northwind,DC=extranet"
userObjectClass="user" userFilter="(ObjectClass=user)"
scope="Subtree" otherRequiredUserAttributes="cn" />
</providers>
</membership>
<roleManager defaultProvider="c" enabled="true" cacheRolesInCookie="false">
<providers>
<add name="c" type="Microsoft.SharePoint.Administration.Claims.SPClaimsAuthRoleProvider, Microsoft.SharePoint, Version=14.0.0.0, Culture=neutral, PublicKeyToken=71e9bce111e9429c" />
</providers>
</roleManager>
Save all your changes and we are done with configuration changes for FBA site.
ii. Modify web.config of Central Administration site
Adding providers for membership and role [if needed]
Before you add any providers find are there any membership or rolemanager tags in the web.config file. And add the providers [<rolemanager> and <membership>] to the <System.Web> tag. Make sure that you are not doing any changes to the existing providers. Finally the <rolemanager> section and <membership> section as shown below. Highlighted in red tags are I added to web.config.
<roleManager defaultProvider="AspNetWindowsTokenRoleProvider" enabled="true" cacheRolesInCookie="false">
<providers>
</providers>
</roleManager>
<membership defaultProvider="ADAMProvider">
<providers>
<add name="ADAMProvider"
type="Microsoft.Office.Server.Security.LDAPMembershipProvider, Microsoft.Office.Server, Version=14.0.0.0, Culture=neutral,
PublicKeyToken=71E9BCE111E9429C" server="SP2010-ADAM"
port="50389" useSSL="false"
userDNAttribute="distinguishedName"
userNameAttribute="userPrincipalName"
userContainer="DC=Northwind,DC=extranet"
userObjectClass="user" userFilter="(ObjectClass=user)"
scope="Subtree" otherRequiredUserAttributes="cn" />
</providers>
</membership>
Save the web.config file and we are done with configuration changes for CA.
iii. Modify web.config of Security Token Service Application
Open inetmgr from run command and open IIS. From the list of sites available expand “SharePoint Web Services” and find SecurityTokenServiceApplication.
Right click on the application and explore, which will opens the file system file location of the application. By default it will be in “%programfiles%\common files\Microsoft Shared\web server extensions\14\WebServices\SecurityToken”. Find the web.config of the application and modify it.
Adding providers for membership and role [if needed]
Before you add any providers find are there any membership or rolemanager tags in the web.config file. And add the providers [<rolemanager> and <membership>] to the <System.Web> tag. Make sure that you are not doing any changes to the existing providers. By default there are providers with name “C” and “I”. So, do not touch them and add only the providers which we are adding like “SQLRoleManager” and “SqlMembershipProvider”. Finally the <rolemanager> section and <membership> section as shown below. Highlighted in red tags are I added to web.config.
<roleManager defaultProvider="c" enabled="true" cacheRolesInCookie="false">
<providers>
<add name="c" type="Microsoft.SharePoint.Administration.Claims.SPClaimsAuthRoleProvider, Microsoft.SharePoint, Version=14.0.0.0, Culture=neutral, PublicKeyToken=71e9bce111e9429c" />
</providers>
</roleManager>
<membership defaultProvider="i">
<providers>
<add name="i" type="Microsoft.SharePoint.Administration.Claims.SPClaimsAuthMembershipProvider, Microsoft.SharePoint, Version=14.0.0.0, Culture=neutral, PublicKeyToken=71e9bce111e9429c" />
<add name="ADAMProvider"
type="Microsoft.Office.Server.Security.LDAPMembershipProvider, Microsoft.Office.Server, Version=14.0.0.0, Culture=neutral,
PublicKeyToken=71E9BCE111E9429C" server="SDP2010-ADAM"
port="50389" useSSL="false"
userDNAttribute="distinguishedName"
userNameAttribute="userPrincipalName"
userContainer="DC=Northwind,DC=extranet"
userObjectClass="user" userFilter="(ObjectClass=user)"
scope="Subtree" otherRequiredUserAttributes="cn" />
</providers>
</membership>
If everything goes well, then in central administration site and your FBA application people picker able to find the users in the ADAM. And you will successfully logged-in to the site without any issues.

Forms Based Authentication in SharePoint 2010 using Sql Memebership Providers
Basically Forms Based Authentication is a part of ASP.NET. So, it supports in all versions of SharePoint which are released after ASP.NET 2.0. In SharePoint 2010 it is the same process as what we did in earlier versions like WSS 3.0 and MOSS 2007 except one thing. In SharePoint 2010 while creating a web application we have an option to choose the application authentication mode Claims Based and Classic Mode. Know more about these authentication modes here.
Creating a web application which uses Claims Based Authentication:
This is pretty much straight forward,
- Open Central Administration
- From Application Management - > Manage Web Applications
- From the top ribbon bar, select New
- From the create web application page, chose the authentication mode to “Claims Based Authentication”
- Give the name of web application, chose port number, path of web application.
- Chose security configuration
- From Claims Authentication Types, enable both WA and FBA.
- In FBA section we have to give ASP.NET Membership provider name. In my case I have used “SQLMembershipProvider” and I am not using any roles so I left it blank.
- Enter Sign in page url [default one], public url and other information and click OK.
- Once web application is created, then create a site collection.
- Now go to Manage Web application and from the list of web applications chose the option “Authentication Providers” from the ribbon.
- From the dialog box you will see the Default zone set to the Claims authentication mode. Click the Default zone link where you can see the settings.
- OK, application is ready and browse the application, you will see the below screen which gives you the option to choose either Windows Authentication or Forms authentication.
- The remaining part is linking our application and the Sql Server database.
Create ASPNETDB to configure membership and Role providers
This process should be done on the database server. The result of the process is a database where we can save all the user and role information.
- Login to the server where SQL Server is installed.
- Open command prompt and navigate to location “%Sysroot%\Microsoft.NET\Framework\v2.0.50727”.
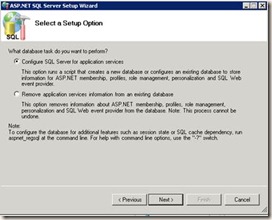
- Run the “aspnet_regsql.exe“. Which will open the ASP.NET SQL Server setup wizard?
- Click “Next” and chose the option “Configure Sql server for application services”
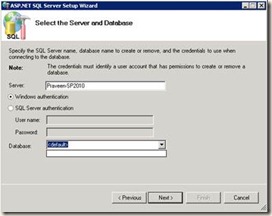
- Click “Next” and give the SQL Server name and authentication information and in database by default it shows <default> means the name will be ASPNETDB, but you can change the name here if you want.
- Click “Next” and Finish the wizard. It will create a database for you with the entire schema required to save users and roles.
- Now, we have to enter some data to the database. For this we have some tools available from Codeplex.
- Go to this site and download “Membershipseeder.zip”
- Extract it and run it and create n number of users and roles [if you want]. Note that if you have given some name to the database other than the default name aspnetdb then in membershipseeder config file please change connection string.
- Now, we are ready with database with all some test data in it.
Give specific permissions to the service accounts:
We have created the database successfully. Before we proceed,
- The service account or application pool user account of our FBA application,
- Application pool account [service account] of central administration and
- Security token service application pool user accounts
should have access to the database to go and get information of the users and roles. Almost in all environments the system administrators creates the service accounts we have to use in our applications. If you are not following those base rules in using service accounts then you may use different service accounts for all the three applications. In that case you have to go through all the three application we have mentioned above and give them access to database. If you are following the riles of using service accounts then may be only one service account used for all the three applications and give the service account access to database.
Modify web.config files of applications to communicate with database using providers
1. To get the users from sql server database to central administration site we have to change web.config of Central Administration site.
2. To get the users from Sql server database to web application which we created to work FBA, we have to change its web.config.
3. To login to the site using claims based authentication, it uses security token service application. So, we have to change its configuration file.
So, the site we created for FBA to work using forms authentication we have to change 3 web.config files totally.
Note: Before you are making any changes to the web.config file of any application please take the backup of it.
The main changes include connection string and providers.
i. Modify web.config of web application we created:
Adding ConnectionString
Add Connectionstring just above <System.Web> starts or just below </Sharepoint> ends.
<connectionStrings>
<add name="SQLConnectionString" connectionString="data source=SP2010-DB-02;Integrated Security=SSPI;Initial Catalog=aspnetdb" />
</connectionStrings>
Adding providers for membership and role [if needed]
Before you add any providers find are there any membership or rolemanager tags in the web.config file. And add the providers [<rolemanager> and <membership>] to the <System.Web> tag. Make sure that you are not doing any changes to the existing providers. By default there are providers with name “C” and “I”. So, do not touch them and add only the providers which we are adding like “SQLRoleManager” and “SqlMembershipProvider”. Finally the <rolemanager> section and <membership> section as shown below. Highlighted in red tags are I added to web.config.
<roleManager defaultProvider="c" enabled="true" cacheRolesInCookie="false">
<providers>
<add name="c" type="Microsoft.SharePoint.Administration.Claims.SPClaimsAuthRoleProvider, Microsoft.SharePoint, Version=14.0.0.0, Culture=neutral, PublicKeyToken=71e9bce111e9429c" />
<add connectionStringName="SQLConnectionString" applicationName="/" description="Stores and retrieves roles from SQL Server" name="SQLRoleManager" type="System.Web.Security.SqlRoleProvider, System.Web, Version=2.0.3600.0, Culture=neutral, PublicKeyToken=b03f5f7f11d50a3a" />
</providers>
</roleManager>
<membership defaultProvider="i">
<providers>
<add name="i" type="Microsoft.SharePoint.Administration.Claims.SPClaimsAuthMembershipProvider, Microsoft.SharePoint, Version=14.0.0.0, Culture=neutral, PublicKeyToken=71e9bce111e9429c" />
<add connectionStringName="SQLConnectionString" passwordAttemptWindow="5" enablePasswordRetrieval="false" enablePasswordReset="false" requiresQuestionAndAnswer="true" applicationName="/" requiresUniqueEmail="true" passwordFormat="Hashed" description="Stores and Retrieves membership data from SQL Server" name="SQLMembershipProvider" type="System.Web.Security.SqlMembershipProvider, System.Web, Version=2.0.3600.0, Culture=neutral, PublicKeyToken=b03f5f7f11d50a3a" />
</providers>
</membership>
Save all your changes and we are done with configuration changes for FBA site.
ii. Modify web.config of Central Administration site
Add Connectionstring
Add Connectionstring just above <System.Web> starts or just below </Sharepoint> ends.
<connectionStrings>
<add name="SQLConnectionString" connectionString="data source=SP2010-DB-02;Integrated Security=SSPI;Initial Catalog=aspnetdb" />
</connectionStrings>
Adding providers for membership and role [if needed]
Before you add any providers find are there any membership or rolemanager tags in the web.config file. And add the providers [<rolemanager> and <membership>] to the <System.Web> tag. Make sure that you are not doing any changes to the existing providers. Finally the <rolemanager> section and <membership> section as shown below. Highlighted in red tags are I added to web.config.
<roleManager defaultProvider="AspNetWindowsTokenRoleProvider" enabled="true" cacheRolesInCookie="false">
<providers>
<add connectionStringName="SQLConnectionString" applicationName="/" description="Stores and retrieves roles from SQL Server" name="SQLRoleManager" type="System.Web.Security.SqlRoleProvider, System.Web, Version=2.0.3600.0, Culture=neutral, PublicKeyToken=b03f5f7f11d50a3a" />
</providers>
</roleManager>
<membership defaultProvider="SQLMembershipProvider">
<providers>
<add connectionStringName="SQLConnectionString" passwordAttemptWindow="5" enablePasswordRetrieval="false" enablePasswordReset="false" requiresQuestionAndAnswer="true" applicationName="/" requiresUniqueEmail="true" passwordFormat="Hashed" description="Stores and Retrieves membership data from SQL Server" name="SQLMembershipProvider" type="System.Web.Security.SqlMembershipProvider, System.Web, Version=2.0.3600.0, Culture=neutral, PublicKeyToken=b03f5f7f11d50a3a" />
</providers>
</membership>
Save the web.config file and we are done with configuration changes for CA.
iii. Modify web.config of Security Token Service Application
Open inetmgr from run command and open IIS. From the list of sites available expand “SharePoint Web Services” and find SecurityTokenServiceApplication.
Right click on the application and explore, which will opens the file system file location of the application. By default it will be in “%programfiles%\common files\Microsoft Shared\web server extensions\14\WebServices\SecurityToken”. Find the web.config of the application and modify it.
Add connectionstring
Just above <System.Web> starts add the connection strings tag.
<connectionStrings>
<add name="SQLConnectionString" connectionString="data source=SP2010-DB-02;Integrated Security=SSPI;Initial Catalog=aspnetdb" />
</connectionStrings>
Adding providers for membership and role [if needed]
Before you add any providers find are there any membership or rolemanager tags in the web.config file. And add the providers [<rolemanager> and <membership>] to the <System.Web> tag. Make sure that you are not doing any changes to the existing providers. By default there are providers with name “C” and “I”. So, do not touch them and add only the providers which we are adding like “SQLRoleManager” and “SqlMembershipProvider”. Finally the <rolemanager> section and <membership> section as shown below. Highlighted in red tags are I added to web.config.
<roleManager defaultProvider="c" enabled="true" cacheRolesInCookie="false">
<providers>
<add name="c" type="Microsoft.SharePoint.Administration.Claims.SPClaimsAuthRoleProvider, Microsoft.SharePoint, Version=14.0.0.0, Culture=neutral, PublicKeyToken=71e9bce111e9429c" />
<add connectionStringName="SQLConnectionString" applicationName="/" description="Stores and retrieves roles from SQL Server" name="SQLRoleManager" type="System.Web.Security.SqlRoleProvider, System.Web, Version=2.0.3600.0, Culture=neutral, PublicKeyToken=b03f5f7f11d50a3a" />
</providers>
</roleManager>
<membership defaultProvider="i">
<providers>
<add name="i" type="Microsoft.SharePoint.Administration.Claims.SPClaimsAuthMembershipProvider, Microsoft.SharePoint, Version=14.0.0.0, Culture=neutral, PublicKeyToken=71e9bce111e9429c" />
<add connectionStringName="SQLConnectionString" passwordAttemptWindow="5" enablePasswordRetrieval="false" enablePasswordReset="false" requiresQuestionAndAnswer="true" applicationName="/" requiresUniqueEmail="true" passwordFormat="Hashed" description="Stores and Retrieves membership data from SQL Server" name="SQLMembershipProvider" type="System.Web.Security.SqlMembershipProvider, System.Web, Version=2.0.3600.0, Culture=neutral, PublicKeyToken=b03f5f7f11d50a3a" />
</providers>
</membership>
If everything goes well, then in central administration site and your FBA application people picker able to find the users in the sql server aspnetdb database. And you will successfully logged-in to the site without any issues.

Classic Mode Vs Claims Based Authentication in SharePoint 2010
Classic Mode: This is nothing but Windows Authentication. If any web application is created with Classic Mode Authentication then it cannot applicable to configure forms based authentication. But, to configure this application to use Forms Based Authentication then you can convert from Classic Mode to Claims Based. But, there is no UI exist for doing this conversion. The only way around is through PowerShell.
$app = get-spwebapplication "URL"
$app.useclaimsauthentication = "True"
$app.Update()
But, if an application is created using Claims based and if you want to convert from Claims based to Classic Mode then it is not possible either through UI or through PowerShell. So, remember this.
Claims Based: In SharePoint 2010 for a web application we can enable both windows, forms authentication. In earlier implementation to do this, we have to create two web applications which has different zones and different authentication. But, with the new claims based authentication a single application can have the capability to configure both windows and forms under single URL. All this is possible because of the authentication framework is built on Microsoft Identify Foundation. And it uses “Geneva” framework to handle this authentication.

Installing the Active Directory Lightweight Directory Services [AD-LDS]
This is the replacement of ADAM in previous versions.
Windows Server 2008 or later servers:
If you are using Windows Server 2008 or later versions of the servers then this service included in the Server Roles in Server Manager. To install this service then please follow steps below.
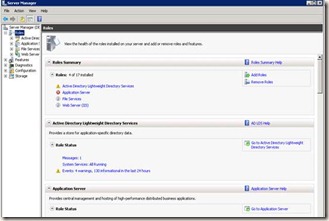
1. Open Server Manager.
2. Click on Roles from the left navigation tree view.
3. On the main panel window you see all the roles installed. And on the right side, you have option to add/remove roles.
4. Click on Add Roles link.
5. A wizard opens up and in the window you will see all roles available on the server. If any role installed then it will be disabled as we have clicked on “Add Roles” option.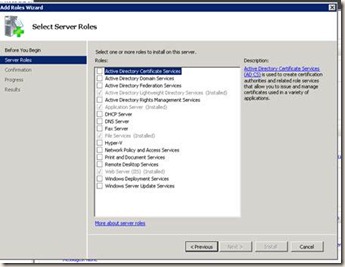
6. From the list of roles, select “Active Directory Lightweight Directory Services”.
7. Click “Next” button and then install.
8. It will take around a minute and completes the installation.
Note: It will be good if you restart your server but, not mandatory.
Windows 7:
Windows 7 is not a server and you cannot find “Server Manager” option. So, we have to download add-in from Microsoft which installs AD-LDS components.
· Download the installer from “AD-LDS for Windows 7”.
· Run the download and wait till installation complete.
Configuring the AD-LDS
I am assuming you are successfully installed the AD-LDS on the system you are using either WS 2008/R2 or Windows 7. If successfully installed then you will find an option named “Active Directory Lightweight Directory Services Setup Wizard” under control panel -> administrative tools.
As we discussed earlier, it allows multiple instances in the same server. So, you can create n number of AD-LDS instances on the server. But, when you create an instance what are actually created and what services it enables etc. in later sections. The physical location of this setup wizard is at “%SystemRoot%\ADAM\adaminstall.exe”. OK, now we have to create an instance of the AD-LDS.
· Double click on the “Active Directory Lightweight Directory Services Setup Wizard”.
· It brings up a wizard where we can create a new instance or create a copy of existing instance.
· Chose option “A unique instance” as we are going to create a new AD-LDS instance and click “Next”.
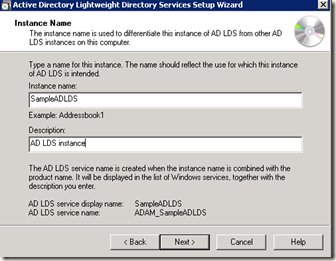
· Give a good name in the “instance name” and type some description. The name should be good because this name will be used in some other places. So, keep giving good names everywhere.
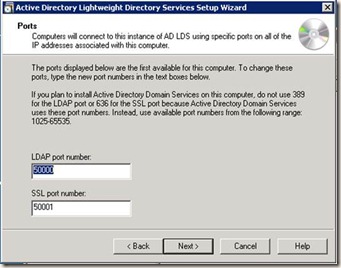
· Click “Next” and from this screen, we have to choose the port numbers. By default it will take 389 for LDAP and for SSL 636. You can change it.
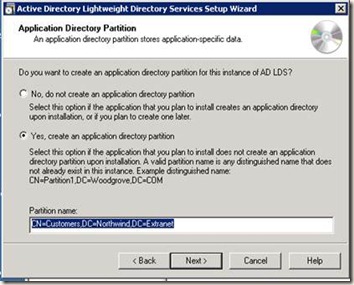
· Click “Next” and select the option “Yes, create an application directory partition” and enter the partition name. I have used “CN=Customers,DC=Northwind,DC=Extranet”.
· Click “Next” and from this screen, we have to give the file locations of where the files will be saved. I left to the default path, but you can give any safe location other than “C:\”
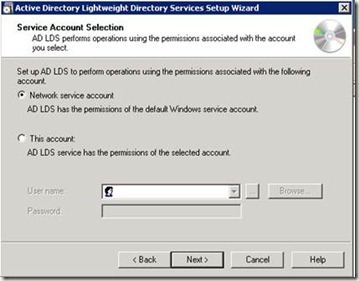
· Click “Next” and chose the service account you want to use. [Under which account the AD-LDS should run.] For testing purpose chose N/S otherwise go for your domain service accounts.
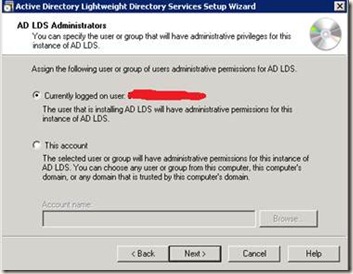
· Click “Next” and select the AD-LDS administrators. If you logged into the server who is an administrator then leave as is, otherwise chose an account.
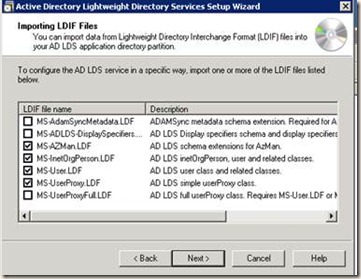
· Click “Next” and here is the interesting part. What LDIF [Lightweight Directory Interchange Format] files you want to import into this AD-LDS. The physical location of all these LDF files is at “%SystemRoot%\ADAM”. [You can see *.ldf files from Command Prompt]. Select all 4 I selected. It is not mandatory to select all. But, MS-User.LDF is mandatory. All other for adding external properties to user or related classes.
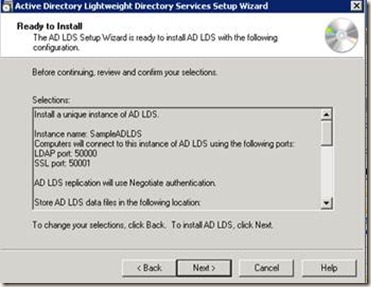
· Click “Next” and this screen gives the complete summary of what we have selected “Ready to install”.
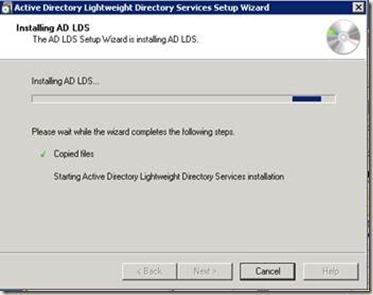
· Click “Next” to install.
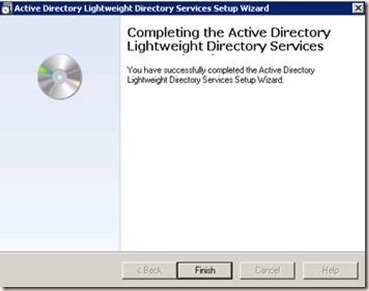
· Click Finish. We are completed with installation process.
Validate AD-LDS:
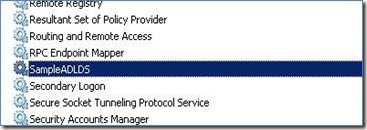
· If everything configured correct then you will see the service running under Administrative Tools -> Services.
· Go to Control Panel -> Programs and Features -> you will see the AD-LDS instance installed.
Connect to the AD-LDS
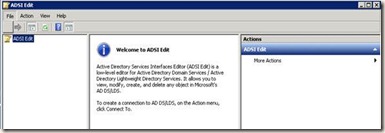
OK, we successfully created and validated everything is successful. Now, we have to see the created instances and do some stuff with it. For this we need some sort of tool to connect to the instance and browse through. The familiar tool what we use regularly is “ADSI Edit”. Go to Control Panel -> Administrative Tools and open ADSI Edit.
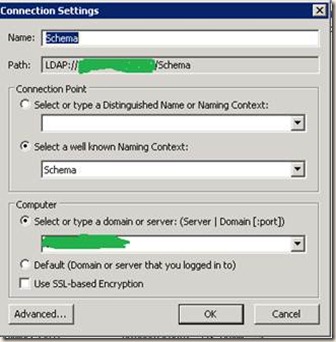
· Now connect to the AD-LDS instance from the option Actions -> Connect to. Give some name to the connection. And from the Connection point, we will check the schema first. So, select Schema. And from the Computer setting, give your server name. And click OK.
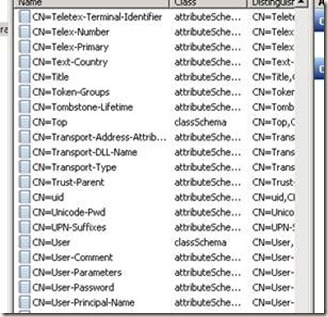
· Now, you will see the complete schema of the available objects. See the schema for user etc...
· Now, we actually need to see data other than schema of the AD-LDS instance. For this we have to connect to the partition of what we have created.
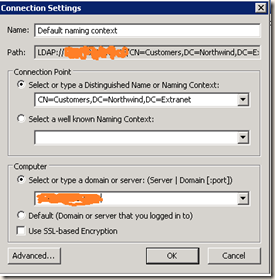
o From Actions -> Connect To. Give some name to the connection and from Connection Point, chose the distinguished name and give the name we have given while creating the instance. And enter the server name and click OK.
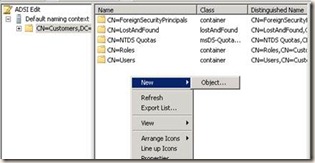
o By default only 4 objects. We have to create an object[Container] named Users to place all the users in it. For that right click on the surface and from the menu, chose new and then object.
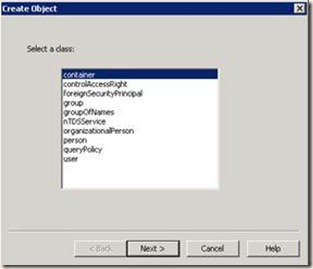
o Select “Container” from the list of options.
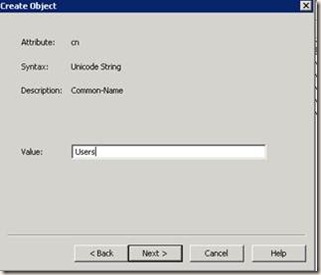
o Enter “Users” in value box.
o Click Finish. Now you see “Users” container.
o Now, expand the “Users” container from left navigation tree and you will see it is empty.
o Create a user in that “Users” container by right clicking on the surface, from Menu, select New -> Object.
o From the “create new object” window select “User”.
o In next screen, give the name of the user.
o Click Finish. User is created in the “Users” container.
o Before use this user we have to set some properties.
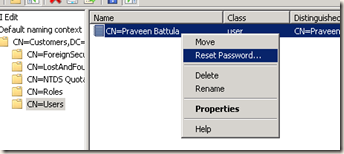
§ Right click on user and select “Reset Password”.
§ After than right click on the user and select “Properties”.
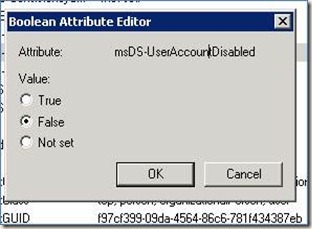
§ From the list of properties available to the user, set the property “msDS- UserAccountDisabled” to false.
Giving permissions to the service account:
This is again what we have to consider and never forget. Against any data source whether it could be database, Active Directory, AD-LDS or any, the application in which we tried to connect to these data sources we should allow the service account to grant read access to the data source. So, here also the same thing, we should grant read permissions to the service account of our application where we are using these AD-LDS. For grating permissions,
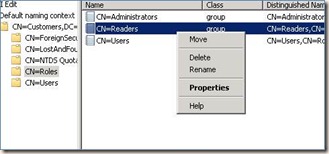
· From the partition, expand find Roles, and then Readers.
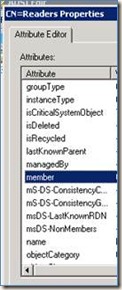
· From properties, you will find a property named “member”.
· Click on “Member” and select “Edit”.
· Add users from this window. If user is windows account user then select the option “Add Windows Account” and choose user and save your changes.
OK. We have completed successfully installing, configuring and creating users in the AD-LDS instance. Now, we can use this AD-LDS in our applications to access user information or authentication. It is very to manage, create or replicate the instances in AD-LDS as like ADAM.
Note: For the AD-LDS the path we have to use in our applications to connect to a specific instance is, LDAP://server-name/partition-name
In our example, if we assume the server name is SP2010-AD then it will be
LDAP://SP2010-AD/CN=Customers,DC=Northwind,DC=Extranet


![clip_image001[4] clip_image001[4]](http://lh4.ggpht.com/_HD--dVed4RY/TYB96PtPv3I/AAAAAAAAAHM/e9k101B5gm8/clip_image001%5B4%5D_thumb%5B1%5D.png?imgmax=800)
![clip_image002[4] clip_image002[4]](http://lh4.ggpht.com/_HD--dVed4RY/TYB97vXV8zI/AAAAAAAAAHU/bJ_qMdci3BU/clip_image002%5B4%5D_thumb%5B2%5D.png?imgmax=800)
![clip_image004[4] clip_image004[4]](http://lh6.ggpht.com/_HD--dVed4RY/TYB99YrAjMI/AAAAAAAAAHc/uFQaH0oA-WM/clip_image004%5B4%5D_thumb.jpg?imgmax=800)
